Thursday, December 23, 2010

Emergency Treats

Do you still need another treat for your cookie tray? Or perhaps you skipped baking all together this season and now feel obligated to bring something tasty to the family Christmas gathering?

This is an easy, fun solution you can force the kids to do for you.

Of course, if you do that you’ll deprive yourself of the pleasure of pummeling out your holiday stress crushing that bag of mini candy canes.

There are so many options for these treats. White chocolate coating looks beautiful with colored frosting drizzle and candy canes are always striking and festive. Oooo or indulgent dark chocolate and caramel scattered with chopped nuts would be good.

Then there are countless dipping devices too. Pretzel sticks, mini pretzels, potato chips, Oreos, thin chocolate wafers and even dog bones for your favorite furry friend.

My personal favorite this year are Biscoff cookies. They’re a thin, crunchy cross between graham crackers and gingersnaps.

I know you’re busy and won’t stall you any longer. Let’s get started!

Emergency Treats
Switch up the colors and candy for other holidays, celebrations or game days.

Base

1 bag white chocolate coating

Dipping Device Options (Pick one)
Pretzel sticks
Mini pretzels
Oreos
Biscoff cookies
Thin chocolate wafer cookies
Sugar cookies
Shortbread
Biscotti
Ruffles potato chips
Candy canes
Dog bones (Don’t dip human treats with these please!)

Coating Options (Pick one or more)
Crushed Mini Candy Canes
Sprinkles
Wilton Cooking Icing
Melted colored candy melts
Melted chocolate
Melted caramel squares (prepped as for apples)
Chopped toasted nuts

Lay out several feet of wax paper near your dipping area.

Melt white chocolate coating in a microwave safe bowl, or in a tall glass for pretzels on high for 30 seconds. Stir and microwave 30 more seconds. Repeat until melted.

Dip dipping devices into coating shaking off the excess. If using crushed candy canes or nuts sprinkle the base area on the wax paper. Lay the dipping device down and sprinkle the tops and sides. Let set.

If dressing dipping devices with icing, melted chocolate or caramel, first let the coating set then drizzle as desired.

By Laura Flowers.


Wednesday, December 22, 2010

Hershey’s Mint Chocolate Thumbprints

Help! Too many cookies! I need a salad stat! Unfortunately there are no salads to talk about in the near future because if I don’t share a couple more treats it’ll be next year before I get them to you.

As you can tell, I’m a bit behind. A way bit behind and I might be sharing holiday recipes until mid January. (You think I’m kidding don’t you?) Tis the season though and that has to be ok. Besides, I’m counting on you to be a bit behind too so I can feel better about my failure as a human to get my thousand item list accomplished.

I hope you’ll forgive another cookie recipe. This one I shared a year or so ago with a few MySpace friends (most of us are long gone from poor old MySpace now). Spastically, when I deleted the account I lost many of those recipes I’d shared. Though lucky for me, my friend Marina was on the ball and was able to give me back a copy of this one.

I’m so glad to have organized friends. Now if only they could get me organized!

Hershey’s Mint Chocolate Thumbprints


Printer Version
1/2 cup (1 stick) butter or margarine, softened

2/3 cup sugar

1 egg, separated
2 tablespoons milk

1 teaspoon vanilla extract

1 cup all-purpose flour

1/3 cup cocoa powder

1/4 teaspoon salt
Hershey’s Mint Kisses
Wilton’s Mint Brownie Drizzle (Found at Michaels)

1. Beat butter, sugar, egg yolk, milk and vanilla in medium bowl until fluffy. Stir together flour, cocoa and salt; gradually add to butter mixture, beating until blended. Refrigerate dough at least 1 hour or until firm enough to handle. 


2. Heat oven to 350°F. Lightly grease cookie sheet. Shape dough into 1-inch balls. Place on prepared cookie sheet. Press thumb gently in center of each cookie. 


3. Bake 9 to 11 minutes or until set. Remove wrappers from chocolate pieces. Remove cookies from cookie sheet to wire rack; cool 3 to 5 minutes. Gently press chocolate piece in center of each cookie. Cool completely.

4. Warm mint drizzle as directed if needed and zigzag over cookies. Let set and enjoy.

Recipe adapted from Hershey.com. Photograph by Laura Flowers.


Tuesday, December 21, 2010

Buckeyes. Ooo Peanut Butter and Chocolate Oh My!

One peanut buttery chocolate bite in I knew I had to have this recipe! My neighbor Terri gifted me with a sack full of these no-bake candies and thankfully (yay for me!) was willing to drop off the recipe as well.

I’m so lucky to have nice neighbors who share their Buckeyes. If it were me, I probably would’ve horded the whole batch.

Buckeyes
Printer Version
These soft peanut butter candies coated in chocolate have proven popular with kids and adults alike around here.


1 1/2 cups smooth peanut butter
1 cup butter, softened
1/2 teaspoon vanilla extract
6 cups confectioners’ sugar
4 cups semisweet chocolate chips

1. In a large bowl, mix together the peanut butter, butter, vanilla and confectioners’ sugar. The dough will look dry. Roll into 1-inch balls and place on a waxed paper-lined cookie sheet.

2. Press a toothpick into the top of each ball (to be used later as the handle for dipping) and chill in the freezer until firm, about 30 minutes.

3. Melt chocolate chips in a double boiler or in a bowl set over a pan of barely simmering water. Stir frequently until smooth.

4. Dip frozen peanut butter balls in chocolate holding onto the toothpick. Leave a small portion of peanut butter showing at the top to make them look like Buckeyes. Put back on the cookie sheet and refrigerate until serving.

Recipe via neighbor Terri Guenthner. Picture by Laura Flowers.


Monday, December 20, 2010

Elves’ Favorite Dessert. Run Away!

Glancing through recipes for a winter photo assignment I spot something quite out of the ordinary. Fluff. What the heck is fluff? Isn’t that the stuff hidden in the back corner of salad bars old ladies eat?

So I make, style and shoot this fluff stuff, all the while sniffing my nose up at it. I do not eat fluff. No one eats fluff! In a hurry, I stuff strangely pale green fluff back into the Cool Whip container and get back to work.

After several more hours of shooting I start to crave something sweet. Peering into the fridge I sigh and gingerly take out the evil fluff container. I take a spoon and dip it into said crazy evil fluff.

It was there at that very moment something magical happened.

I liked it. Really, really liked it! Unfortunately, I "liked" it so well that I ate the entire container all by myself over the next several days.

So what do you think I did after eating an entire container of yummy pistachio fluff? That’s right. I made a whole new batch just for me.

Ah fluff, I love you. Wait a second... Does this make me an old lady?

Elves’ Favorite Dessert
Printer Version
1 tub Cool Whip (thawed)
1 small box pistachio pudding
1 small can crushed pineapple

Mix pineapple with it's juice and pistachio pudding powder together in a medium sized bowl. Fold in Cool Whip. Store fluff inside the Cool Whip container and chill before serving.

“Yum Food and Fun for Kids”, Winter Issue 2010. Recipe from Menu Mom Christine Steendahl. Photograph by Laura Flowers.


Thursday, December 16, 2010

Gingerbread Cheesecake Bars

Man, this head cold has robbed me of my brain cells. I sit down to do something and can’t remember what it was. By the time I remember, I’m up and running to grab a tissue. When I return to my computer I can’t remember what I’m supposed to be doing again!

Since my brain seems to be taking a (hopefully short) hiatus, today’s recipe is one I’ve been meaning to share for awhile.

Wait, what was I doing? And where are my pants? Excuse me, I need another tissue.

Gingerbread Cheesecake Bars
Printer Version
I can’t resist collecting those little holiday cookie pamphlets at the end caps of grocery stores. This recipe happens to come from one of my favorites, the 2008 issue of "Holiday Cookies".


1 package (8 ounces) cream cheese, softened
2/3 cup sugar, divided
3 eggs
1/2 teaspoon vanilla
1 1/2 teaspoons ground ginger, divided
1/2 cup (1 stick) butter, softened
3/4 cups molasses
2 cups all-purpose flour
1 teaspoon baking soda
3/4 teaspoon ground cinnamon
1/4 teaspoon salt
1/4 teaspoon ground allspice

Preheat oven to 350 degrees. Grease a 13x9-inch baking pan.

For Cheesecake Layer:
Beat cream cheese and 1/3 cup sugar in a medium bowl with electric mixer until light and fluffy. Add 1 egg, vanilla and 1/2 teaspoon ginger; beat until well blended and smooth. Refrigerate until ready to use.

For Gingerbread Layer:
Beat butter and 1/3 cup sugar in a large bowl at medium speed until light and fluffy. Add molasses and 2 eggs; beat until well blended.

Combine flour, baking soda, 1 teaspoon ginger, cinnamon, salt and allspice in a medium bowl.

Add flour mixture to butter mixture; beat until just blended. Spread batter evenly in pan. Top with cream cheese mixture. Swirl in the cream cheese with a knife until the gingerbread mixture starts to show through.

Bake for 25 to 30 minutes or until toothpick inserted into center comes out clean. Cool completely on wire rack. Store in the refrigerator.

Recipe from "Holiday Cookies", published by PIL 2008. Picture by Laura Flowers.


Monday, December 13, 2010

Oven Roasted Garlic Brussels Sprouts

You need this Brussels sprout recipe in your life. Wait, stop! Don’t run away. I’m serious. When these odorous little vegetables are roasted with garlic and olive oil they turn into creamy umami heaven.

If you don’t already love Brussels sprouts please make this dish. You'll love me for it.

Oven Roasted Garlic Brussels Sprouts

Printer Version
I wrote the recipe for 2 lbs of Brussels sprouts, as that’s the size of the Costco bag. You can easily reduce or increase the amount, just use an appropriately sized baking dish.


2 lb Brussels sprouts, trimmed and halved (quartered if large)
5 cloves garlic, minced fine or pressed through a garlic press
1/2 cup water
2 tablespoons extra-virgin olive oil
1/2 teaspoon sea salt
1/2 teaspoon black pepper

Move oven rack to the upper third and preheat to 425 degrees.

In a 9x13 inch baking dish, toss together Brussels sprouts, garlic, water, oil, salt and pepper and spread out in a single layer.

Bake for 40-50 minutes until caramelized to taste, tossing once about 25 minutes into cooking time. Remove from oven and toss Brussels sprouts in the pan scraping up brown bits into the sprouts.

Recipe & photograph by Laura Flowers.


Friday, December 10, 2010

Buttermint Drop Cookies

Last week I was naughty and sent my husband to work with store-bought frosted sugar cookies. Sometimes these things can’t be helped. With only three days to scrub and paint the walls milk chocolate brown before Jesse arrived home, cookies were last on my to-do list.

I’m not sure City Hall has forgiven me yet, but hopefully today’s cookie will make them forget about this little faux pas.

Buttermint Drop Cookies
Printer Version
These cookies aren’t named so because they utilize buttermints as an ingredient, but because they taste like them.


Heads up: This dough should chill for an hour or two before baking. You can skip this step, but your cookies will be prettier if you can wait. (Yes, you caught me, those are "I'm impatient and I'll just skip a step" cookies on the left.)

1 stick (1/2 cup) unsalted butter, softened
1 1/2 cups granulated sugar
1 1/2 cups light brown sugar
1 teaspoon salt
4 eggs
Green food color, paste or liquid
2 teaspoons vanilla extract
1/2 teaspoon peppermint extract
1 teaspoon baking powder
1 teaspoon baking soda
4 cups all purpose flour
12 ounce bag Guittard Smooth Melty Petite Mint Chips, divided

1. Preheat oven to 350 degrees and line cookie sheets with parchment paper.

2. In a stand mixer beat together butter, granulated sugar, brown sugar and salt. Mix in eggs, green food coloring, vanilla and peppermint extracts. Mix in baking powder and baking soda. Mix in flour until just combined. Add 2/3 of a bag of mint chips reserving the rest for topping. Cover and refrigerate dough for 1 to 2 hours, or until chilled but not solid.

3. With a cookie scoop, scoop the dough 2” apart onto parchment. Press three chips into each cookie and bake for 9 to 10 minutes until edges are golden. Let set for 2 minutes and move to a cooling rack.

Recipe & photograph by Laura Flowers.


Tuesday, December 7, 2010

Vegetable Fried Brown Rice

Healthy and easy, this is one of the most asked for meals around here. I’m always happy to oblige the request, since it means a simple night of cooking for me!

Just be sure to fire up your rice cooker ahead of time.

Vegetable Fried Brown Rice
Printer Version

Rice Prep
If you like to eat a lot of brown rice, you might want to consider buying a fuzzy logic rice cooker. They make brown rice as soft and fluffy as the less healthy white variety.

4 rice cooker cups (3/4 cups each) medium grain brown rice
Water
1 teaspoon salt
1 teaspoon onion powder
1 teaspoon garlic powder
1 tablespoon soy sauce
1 teaspoon sesame oil
1/2 teaspoon hot pepper sesame oil

1. Place the rice in a rice cooker and cover with water. Swish around a couple times and drain out most of the water. Refill and repeat 2 more times.

2. Fill the water to the 4 cup mark on the rice cooker. Add the rest of the ingredients and stir to combine. Hit the start button.

Note: If you don't have a rice cooker, cook rice according to package directions adding in the rest of the rice prep ingredients to flavor.

Fried Rice
1 recipe cooked brown rice
2 eggs w 1/2 teaspoon hot pepper sesame oil
2 tablespoons light colored oil
1 large onion, diced
1 large carrot, cut into thin quarters
1 cup frozen super sweet white corn
1/4 cup soy sauce
1/2 teaspoon salt
1/2 teaspoon onion powder
1/2 teaspoon garlic powder
1/4 teaspoon ground black pepper
2 teaspoons sesame oil
1 cup frozen petite peas
Hot pepper sesame oil to taste

1. Mix eggs with 1/2 teaspoon hot pepper oil. Scramble in a small skillet, chop eggs into small pieces and set aside.

2. In a very large skillet heat the oil over high heat and add the onion, carrot, corn and salt. Sauté until nearly softened. Add the soy sauce and soften the rest of the way. Stir in onion powder, garlic powder, pepper and sesame oil.

3. Add the rice and cook stirring and flipping occasionally until fried and coated. Stir in frozen peas and eggs and cook until peas are warmed through. Taste and add more hot pepper sesame oil, regular sesame oil and/or soy sauce as needed.

Note: This recipe makes enough rice to feed about 8 people. Feel free to cut it in half for a smaller amount. For a vegan version leave out the egg.

Recipe and photograph by Laura Flowers.


Monday, December 6, 2010

Eggnog Drop Cookies

Ok I admit it! I have an addiction to eggnog. You won’t need to worry about admitting me to rehab though since this sinfully rich treat will too soon be gone from store shelves. While awaiting its return, I’ll be left fighting delirium tremens for the next 10 months.

Until then, I’ll celebrate and make these eggnog cookies several more times to go along with my eggnog lattes and my eggnog eggnog.

Eggnog Drop Cookies
Printer Version
These are wonderfully tender sugar cookies with a spiced eggnog background.


1/2 cup unsalted butter, softened
1 cup sugar
1/2 teaspoon salt
1/2 scant teaspoon mace or nutmeg
1 1/2 teaspoons vanilla extract
1 egg
1/4 cup full fat eggnog
1 teaspoon baking soda
2 cups all-purpose flour

1. Line cookie sheets with parchment paper. Preheat oven to 350 degrees.

2. Beat the butter, sugar, salt, mace and vanilla extract together until fluffy. Mix in the egg and eggnog. Mix in baking soda, and then beat in flour until just combined.

3. With a standard (size 50) cookie scoop, scoop the batter and place on sheets 2 inches apart. Sprinkle dough very lightly with mace and bake for 10 minutes, or until golden around the edges. Let rest for 2 minutes on sheets then move to cooling rack.

Makes 32 cookies.

Recipe & photograph by Laura Flowers.


Thursday, December 2, 2010

Slow Cooker Pork Chops and Yukon Gold Potatoes in Dijon Sauce

Did you know if you drop a $3000 refrigerator from the bed of a moving van it will roll and roll and roll some more until it totals itself? Or that the best time to paint the kitchen milk chocolate brown is when the color phobic spouse escapes to Huntsville for a few days?

How about if you start a project, there will be 100 more little things you forgot in the process? Or that the coast of Japan has 450-pound giant jellyfish? Your daughter will then want to spend time before school looking at pictures of them with you, forcing you to use long forgotten math to figure out how many people and dogs she knows it would take to equal the size of one monster jellyfish.

Let’s just say it’s been a week and cooking has been fast and brainless. Much like me today.

Slow Cooker Pork Chops and Yukon Gold Potatoes in Dijon Sauce
Printer Version
Please don’t be scared by the canned cream of mushroom soup. It’s really good. I promise!


6 to 8 Yukon Gold Potatoes (enough to line your slow cooker)
1 (10 3/4 ounce) can Campbell's Healthy Choice Cream of Mushroom soup
1/4 cup dry white wine or chicken broth
1/4 cup Dijon mustard
1 teaspoon dried thyme
1 clove garlic, minced
1/4 teaspoon black pepper
2 tablespoons butter
About 1.70 pound Pork Boneless Rib End Roast (or 6 pork chops)

1. Grease the slow cooker with light colored oil. Scrub the potatoes and place them snuggled together in a large oval slow cooker.

2. In a bowl, mix together soup, wine or broth, Dijon, thyme, garlic, and pepper. Pour mixture over potatoes.

3. If using, slice the roast half. Then slice each half into 3 pieces. Set aside.

4. In a large skillet, melt the butter until the foam subsides over high heat. Place the pork chops in the pan and season with salt and pepper. Quickly sear the bottom. Turn chops over and season again. When finished place the chops on top of the potatoes. Scrape pan drippings into the slow cooker as well.

5. Cover and cook on low heat for 7 to 8 hours or on high for 3 1/2. Plate and spoon sauce over potatoes and pork chops. Season with salt and pepper before serving.

Recipe adapted from "Better Homes and Gardens Biggest Book of Slow Cooker Recipes". Picture by Laura Flowers.


Monday, November 29, 2010

Pumpkin Spice Eggnog French Toast & Me

This very random day started by feeling deeply unsettled over my torn apart kitchen and cluttered beyond recognition kitchen table. When crap fills up the coveted space we're supposed to have family meals I sort of fall apart and become obsessed with other details. Like playing on Facebook all morning.

While over there, my friend Missy asked that I fill out 30 Random Things About Me and of course I had to comply. Not doing so would have me doing productive things. Like leaving the house for the first time today. Or God forbid, dishes.

Here are my answers. If you feel up to it do this yourself and please come back and let me know so I can visit!

First though, the recipe, as it's a heck of a lot shorter than my rambling.

Pumpkin Spice Eggnog French Toast
Printer Version
You can make this with regular eggnog too if you can’t find the other. The only trick to this quick breakfast is butter. You must very generously butter your pan or the bread will stick like the dickens.


Sliced Bread
Pumpkin Spice Eggnog
Butter

1. Place some eggnog in a wide shallow bowl. Set bread and bowl beside the stove.

2. Heat a good dollop of butter in a skillet over medium high heat until the foam begins to subside. Soak bread on both sides and shake off the excess nog.

3. Fry bread on one side. When golden brown, lift up the slices and add a little more butter. Flip the bread over and cook until done. Repeat until happy.

4. Serve with a sprinkle of powdered sugar and maple syrup if desired.

30 Random Things About Me

1. When my kitchen table is covered in crap I feel deeply unsettled.

2. I love my dog like he’s my child and feed him accordingly, much to the dismay of his vet.

3. I love gleaning (stealing) fruit off trees that stick out in local alleys.

4. I believe in higher ethics. Meaning that picking between lesser evils will happen more often than true ethical situations and sometimes your choices will be part naughty. (See above.)

5. I am part naughty/ ornery/ rebellious at all times by choice.

6. I am afraid of hurting myself again, but refuse to stop taking risks. About twice a year I beat the holy snot out of myself in some dumb way. This will probably be how I die.

7. After visiting my mom I always run home and purge my house of clutter. Speaking of mom’s house, big houses overwhelm me. All I can think about is how much crap you can stuff into too much space and how expensive the heating bill is.

8. I’m an inclusive person and like to involve everyone and introduce all my friends to each other.

9. I am obsessed with conversion vans and badly want one. I love the idea of staying packed up and leaving town at short notice as I travel frequently.

10. I was at one time an Army soldier.

11. White walls bore me. So do white kitchen appliances.

12. I once swore to God as a professional photographer I would never shoot food. Lesson learned: Never tell God you won't do something.

13. I love to read. Love love love to read and very frequently stay up until 4am doing so.

14. I’m sad my daughter doesn’t like to read, but I’m working on her.

15. I tell my husband every single day we need to move to Austin, Texas and he ignores me each and every time. I’ve considered leaving him over this issue. Usually in the dead of winter when it’s freezing miserable cold out.

16. I’m only serious when I’m angry, which isn’t very often.

17. I think it would be fun to be a carnie traveling around the country setting up fairs and I haven’t ruled this out as a future profession.

18. I wish my parents liked me better and wanted to spend actual time with my family and I. However, I don’t waste too much time on wishful thinking and have adopted other parental figures.

19. I love my foodie friends. If you are a foodie, you are my friend.

20. If you make me laugh I’m loyal forever.

21. If I make you laugh I’ve done my duty for the day.

22. I make fun of and mimic serious and stuffy people.

23. I love my brothers and their families! They’re the best.

24. I try to use my favorite pink skull mug every morning and am sad when it’s dirty.

25. I believe in breakfast and don’t trust people who skip this favorite meal.

26. I’m proud to be University of Idaho alumni only because I get to say I’m a “Vandal”.

27. After living in the Czech Republic a few years ago I’ve come to deeply appreciate considerate, kind American males. Our men are the nicest anywhere and this is one of few places we can have true male friends.

28. I like to ride my bicycle; I like to ride my bike. Sing it with me now! It’s true though. When it’s warm outside I enjoy riding the 24 miles to Troy, Idaho and back.

29. If I’m told “no” I find a way around it even if I have to pay the consequences. Sometimes it involves things like painting the kitchen behind my color phobic spouse's back while he's at work. Or sneaking alcohol into my cooking for Jesse's alcohol adverse family.

30. My favorite thing in the world is to feed and play with my family, friends, neighbors, strangers and dog. Nothing makes me happier.

Recipe and photograph by Laura Flowers.


Tuesday, November 23, 2010

Pumpkin Knot Rolls


One of my favorite things about my friend Julie is her fearlessness. This applies to her cooking and baking too, and I’m always learning something new from her. Like how to make these knot style squash rolls.

Julie substituted squash from her garden for this recipe, which gave them a beautiful orange hue. You can also make them with roasted and mashed sweet potatoes if you prefer. Or canned pumpkin works too I suppose, as the recipe instructs us to do!

Pumpkin Knot Rolls
Printer Version
This pretty recipe comes from the Taste of Home website.


2 packages (1.4 ounces each) active dry yeast
1 cup warm milk (110° to 115°)
1/3 cup butter, softened
1/2 cup sugar
1 cup canned pumpkin
3 eggs
1-1/2 teaspoons salt
5-1/2 to 6 cups all-purpose flour
1 tablespoon cold water

In a bowl, dissolve yeast in warm milk. Add the butter, sugar, pumpkin, 2 eggs, salt and 3 cups flour. Beat until smooth. Stir in enough remaining flour to form a soft dough.

Turn onto a lightly floured surface; knead until smooth and elastic, about 6-8 minutes.

Place in a greased bowl, turning once to grease top. Cover and let rise in a warm place until doubled, about 1 hour. Punch dough down. Turn onto a lightly floured surface; divide in half.

Shape each portion into 12 balls. Roll each ball into a 10-in. rope; tie into a knot and tuck ends under on each side.

Place 2 in. apart on greased baking sheets. Cover and let rise until doubled, about 30
minutes. In a small bowl, beat water and remaining egg. Brush over rolls.

Bake at 350° for 15-17 minutes or until golden brown. Remove from pans to wire racks.

24 Servings Prep: 30 min. + rising Bake: 15 min.

Recipe from Taste of Home 2010 submitted by Dianna Shimizu Issaquah, Washington. Rolls made by Julie Hopper. Picture by Laura Flowers.


Monday, November 22, 2010

Corn and Cheese Pudding with Green Chiles

This comforting side dish is a nice change from plain old corn on Thanksgiving, but also can be a tasty meal itself with a healthy salad on busy weeknights. The original recipe comes from Dishboy Scott via his mom and an early 1970s Vegetarian Epicure cookbook.

Corn and Cheese Pudding with Green Chiles
Printer Version
When I think of the 1970s I wonder why anyone ever wanted to be vegetarian. Though sometimes, surprisingly tasty recipes like this one are a bright spot in a strange era of food.


2 eggs
3 tablespoons flour
1/2 cup sour cream
1 scant cup milk
1/2 teaspoon salt
1/4 teaspoon black pepper
1 teaspoon sugar
2 cups frozen super sweet corn
3 tablespoons melted butter
3 ounces sharp cheddar cheese
4 ounce can mild diced green chiles, drained

1. Preheat oven to 350 degrees. Butter a casserole dish.

2. Beat eggs and flour to make a smooth paste. Beat in sour cream, milk, salt, pepper and sugar. Stir in corn, melted butter, cheese and chiles.

3. Pour into casserole dish and bake for 50 to 55 minutes until slightly puffy and golden brown. Let stand for 10 minutes before serving.

Recipe slightly adapted from a 1970s Vegetarian Epicure cookbook. Picture by Laura Flowers.


Saturday, November 20, 2010

Deep Fry That Turkey!


I love to deep fry things. I think this goes back to my first real job. Real meaning when I wasn’t paid in peanuts for picking strawberries, or placing flyers on car windshields before the “working age” of sixteen. Slaving away at McDonald's and being paid minimum wage for the first time in my life, I was stepping up in the world!

I worshipped McDonald's back then and could eat their food for breakfast, lunch, and dinner for at least a week straight. My favorite job was working the fryolator. I loved watching the hot oil come alive into a monster of noise and bubbles when I dropped in fries, chicken nuggets, and Filet-O-Fishes.

Since that time I’ve been obsessed really. I fry everything I can, and have gone through multiple fryolators in my adulthood. Nothing though, captures my attention more than the giant turkey frying pot that my brother and sister-in-law bought me for Christmas one year. I love LOVE that thing.

Although now, after many years of singeing off my eyebrows and arm hair while lighting stoves and grills, I have a nice healthy phobia of propane and fire together. Jesse and Dishboy Scott had to help me by taking orders, lighting and un-lighting as I directed. For some reason I have no fear of skin melting hot oil, and ecstatically enjoyed, manically really, frying this turkey.

What I learned deep frying turkeys.


1. Make sure you have enough oil to cover the bird. You might need to go a bit above the fill line on your pot as I did, but never put in a bigger turkey than your frying instruction manual says it can handle.

2. Peanut oil is expensive and impossible to find in my 150 mile shopping radius. I used Kirkland Signature Creamy Liquid Shortening from Costco instead. It worked great and only cost about $20 for a vat I could nearly swim in. Well, if one would want to swim in creamy liquid shortening.

3. Heat the deep fryer 25 degrees above where you want to fry. I heated the oil to 350 so my final temperature was 325 degrees Fahrenheit.

4. Wear full battle rattle: Pants, closed toed shoes (no flip flops you college students!), long sleeve shirt, asbestos gloves, hat, protective eyewear, kevlar helmet, and flak vest. Oops those Army days are over. Skip the kevlar and flak vest. However, if you’re a female with long hair like I am, or Fabio, tie it back! There’s nothing like the smell of crispy fried human hair.

5. Make sure your bird is completely thawed and dry, inside and out. Very extremely incredibly exceptionally completely thawed and dry.

6. Turn off the fire before lowering in the bird. This will enable you to spend Christmas, New Years, and Valentine’s Day far away from the intensive care burn unit.

7. Lower the bird very extraordinarily painfully slowly into the oil, over about 1 ½ minutes. If the oil boils too furiously, pull the bird up a bit and try again slowly.

8. Then turn the gas back on. Monitor the temperature.

9. Cook birds for about 3 to 3 ½ minutes per pound until crispy and golden.

10. Turn off the fire before removing the bird. Again, holidays in the burn unit are no fun. Have a foil covered rimmed baking sheet very close, and lift the bird onto it.

11. Frying a turkey is fun, thrilling, and yummy, and now I want to do it every week. So please, take what I’ve learned and go forth terrified, but determined and excited.

Since I’m a turkey frying novice here's a bunch of links I used from expert turkey frying geniuses:

1. Chow’s “How to Fry a Turkey, 10 Steps to Satisfaction”.

2. Alton Brown’s Fried Turkey episode on YouTube.

3. Gumbo Pages has lots of excellent information. They also bring up bird injections. I just fried the darn thing plain though, but I love their article.

4. EatTurkey.com. What a cool site lol! Of course they show us how to incinerate these birdies. Plus they tell us how to gauge the amount of oil to use.

5. Wikihow has a step by step guide.

6. About.com also has step by step instructions.

7. Are you tired of these yet? Yes? Convinced? No? Let’s carry on then soldier.

8. For fun, how about How NOT to Fry a Turkey on YouTube?

I could go on and on and on as Google is a god-like resource. I think you get the picture though. Deep fry, deep fry, deep fry and deep fry that Thanksgiving turkey to golden perfection. Just take those few precautions while doing so and you’ll have a beautiful golden turkey that’s crispy on the outside and juicy and perfectly cooked on the inside.

Save that carcass for broth! Those deep fried bones are a goldmine of flavor.

And as my friend Robin from Texas says, "Don't fry your turkey on your front porch like they do in Texas!" Evidently there are a number of house fires fueled by too many Bud Lights and porch turkey frying on Thanksgiving Day. Thanks Robin, I never thought of that one!

I have got to visit Texas.

Pictures and insanity provided by Laura Flowers.


Friday, November 19, 2010

Sweet and Salty Stovetop Popcorn

At very long last (at least in my mind), Harry Potter and the Deathly Hallows opens tonight! I’ve been waiting forever for this day and it’s finally here.

Distracted all week with anticipation, I filled the big black void by avoiding work, making my own popcorn and watching the last couple Harry Potter’s on DVD. My single consolation? The popcorn is a whole lot tastier at home.

It’s 4 a.m. Can I get in the ticket line now? No? How about now? Do you think I'll get arrested if I break into the theater and play my own movie?

This is agonizing. How am I going to get through the day like this? Breakfast popcorn anyone?

Sweet and Salty Stovetop Popcorn
Printer Version
Kettle st
yle popcorn pops right on your stove.

3 tablespoons extra light olive oil or vegetable oil
1/2 cup popcorn kernels
3 tablespoons vanilla flavoring syrup
1 tablespoon butter
1/2 teaspoon salt

Warm oil over medium high heat in a heavy 4 quart pot with a handle for one minute. Stir in popcorn kernels and give the pan a shake to spread them out. Loosely cover the pot with a lid so some of the heat can escape.

When the first pops begin secure the lid and move the pot back and forth gently until the popping slows. Turn off the heat and move the popcorn to a bowl.

Place the vanilla syrup, butter, and salt in a small saucepan and bring to a boil over medium high heat. Boil for two minutes stirring constantly. Drizzle mixture over popcorn and toss to combine.

Total time 10 minutes.

Recipe & photographs by Laura Flowers.


Thursday, November 18, 2010

Scare Your Family with Carrot Raisin Bran Muffins

My family will not eat these muffins. They don’t do bran, carrots, walnuts or raisins in their baked goods. They don’t like that these muffins aren’t covered in chocolate. They in fact, even loathe the healthy sound of the word “bran”.

Therefore, these toasty wonderful carroty bran muffins are mine. All mine! I stuck them in my freezer and have been enjoying one or two at a time. All the while, telling my family how awful they are the entire time I’m eating and that I sacrifice myself for their happiness.

Somehow, I don’t think they believe me. Perhaps I’d be more convincing if I stopped saying, “Yum!” after every bite.

Carrot Raisin Bran Muffins
Printer Version
You too can scare your family into thinking bran muffins taste terrible. Then you can feel good about having these healthy beauties all to yourself.


1 cup all-purpose flour
1 cup whole wheat or white whole wheat flour
1 cup unprocessed bran
2 cups bran flakes, crushed
2 teaspoons baking powder
1 teaspoon baking soda
1/2 teaspoon salt
1 tablespoon cinnamon
2 1/2 cups finely shredded carrots
3/4 cup raisins
3/4 cup chopped walnuts
4 eggs
3/4 cup extra light olive oil or vegetable oil
3/4 buttermilk or applesauce
1 1/4 cups firmly packed dark brown sugar
1/4 cup molasses
Coarse sugar or granulated sugar for sprinkling

1. Preheat oven to 350 degrees and grease muffin tins.

2. In the microwave, toast walnuts on a plate on high power in 30 second increments. Toss and repeat 1 or 2 more times until toasted.

3. Combine in a large bowl; all-purpose flour, whole wheat flour, bran, crushed bran flakes, baking powder, baking soda, salt and cinnamon. Stir to combine. Add carrots, walnuts and raisins and toss to coat.

4. To another large bowl add eggs, oil, buttermilk or applesauce, brown sugar and molasses. Whisk to combine. Pour the wet mixture into the dry and stir until it just comes together.

5. Fill tins 3/4 full and sprinkle with sugar. Bake 17 to 20 minutes, or until a toothpick inserted in center muffins comes out clean.

Makes about 22 muffins

Recipe & photograph by Laura Flowers.


Wednesday, November 17, 2010

Creamy Shrimp & Bacon Salad

I better just open this up with my internal dialog: “Ooo why buy just one can of shrimp when I can get four at Costco? Have I ever purchased canned shrimp before? No. Well ok why would I buy it now? Because dummy, you get four cans!” Makes sense right?

Please don’t insert logic here. You’ll crush my heart.

Ok, so I get strange tiny shrimp home. Now what? Um, hmm. I could donate it to the food bank. Or I could make salad with micro mini sized shrimp.

So salad it was. Tasty, salty, bacony, creamy salad. We had it on greens the first day and as a sandwich the next.

Creamy Shrimp & Bacon Salad
Printer Version
This salad makes a nice change from typical brown bag lunch fair. When served as a sandwich, you might find yourself looking forward to lunch at your desk.


Sauce
1 cup mayo
1 tablespoon horseradish
Juice of 1/2 a lemon
1/4 teaspoon ground black pepper

Salad
4 (4 ounce) cans East Point Tiny Shrimp (Found at Costco, but deli shrimp work too.)
3 boiled eggs, diced
5 slices cooked bacon, chopped
1/2 a red onion, minced
2 stalks celery, diced small
Salt as needed

1. In a bowl, mix the sauce ingredients together. Store in the refrigerator while prepping salad ingredients.

2. Toss the salad ingredients and sauce ingredients together in a large bowl. Taste for salt and add to taste if needed. Serve on bread as a sandwich or on top of mixed greens.

Recipe & photograph by Laura Flowers


Monday, November 15, 2010

Spicy Vegetarian Tortilla Soup & Giveaway

I’ve been shooting food from dawn until dusk today. Never mind that dawn began about 7am and dusk hit at 3pm. When the heck did I move to Alaska? Please tell me this isn’t part of global warming.

Hello Texas people! Anyone willing to adopt me? I cook. I’m typically a happy fun person. I just can’t stand another dark cold winter. Sigh…

Soup helps. Steaming, spicy, colorful tortilla soup somehow makes life bearable when the weather is black and gloomy. It makes the day a little less dreary with steamy flavorful bites. It’s my comfort, at least until my Texas dream family adopts me.

Speaking of soup, last week was split pea soup week and my local lentil people sent me a giveaway box with a tasty secret split pea soup recipe. To sweeten the deal, I’ve added a jar of tangy beautiful Knapweed honey from the pristine Northern Idaho forest. Just tell me what your favorite winter comfort food is and these goodies might be yours.

Friday the random number generator thingy will spit out a winner. If you don’t have a blog contact, leave me an email address so I can contact you.

Spicy Vegetarian Tortilla Soup

Printer Version
Holy yum Batman! This is my new go to tortilla soup recipe.


2 tablespoons ground cumin

2 teaspoons sweet paprika

2 teaspoons chili powder

1/2 teaspoon garlic powder

1/2 teaspoon onion powder

1/2 teaspoon dried oregano

1 teaspoon coriander
1 1/2 teaspoons salt
1/2 teaspoon black pepper
3 tablespoons light colored oil
1 large onion, diced
1 green bell pepper, diced
1 red bell pepper, diced
3 cloves garlic, minced
1 (4 ounce) can diced mild green chiles, drained
2 (10 ounce) cans RoTel Diced Tomatoes with Lime & Cilantro 

1 (15 ounce) can whole kernel corn, drained
2 (32 ounce) containers Swanson Organic Vegetable Broth

2 (15 ounce) cans black beans, drained and rinsed
Juice of 1/2 a lime

1. In a small bowl mix together cumin, sweet paprika, chili powder, garlic powder, onion powder, oregano, coriander, salt and black pepper. Set aside.

2. In a large pot heat the oil over medium high. Add the onions and bell peppers. Sauté until soft, stirring occasionally. Add the spices and garlic; cook for 2 minutes.

3. Add the green chile peppers, RoTel, corn and vegetable broth. Cook until warmed through. Add the black beans and cook for 2 minutes before serving. Squeeze in lime juice. Serve in bowls and garnish as desired.

Garnish Ideas

Tortilla chips

Shredded Cheddar, Mexican blend or Cotija cheese
Diced Avocado

Chopped cilantro

Sour Cream

Hot Sauce

Recipe and photograph by Laura Flowers.


Thursday, November 11, 2010

Linguini in Tex-Mex Pepper Cream Sauce

Sweet bell peppers, green chiles, garlic and sour cream blend together for this speedy Tex-Mex inspired dinner.

Was that me who said they never wanted to eat again after last weekend? No, it couldn’t be. It must’ve been some other silly woman who gorged herself and complained about it.

Linguini in Tex-Mex Pepper Cream Sauce

Printer Version
Pureeing the ingredients together in a food processor makes this a very quick weeknight meal.


1/2 cup shelled pumpkin seeds (pepitos), found in the bulk isle
2 tablespoons olive oil
1 large onion, diced
1 red bell pepper, diced
1 teaspoon salt
3 cloves garlic, minced
1 cup sour cream
1/4 cup cilantro, plus more for garnish
4-ounce can mild diced green chiles
2/3 cup shredded Mexican cheese blend
1/2 teaspoon black pepper
1/8 to 1/4 teaspoon cayenne pepper, to taste
1 pound linguini pasta

1. Place the pumpkin seeds on a plate and microwave in 30 second increments 3 to 4 times until toasted. Set aside.

2. Heat olive oil in a large skillet over medium high heat. Add the onions, bell peppers and salt and cook until tender stirring occasionally. Add the garlic and cook for one minute. Meanwhile cook the pasta in salted water according to package directions

3. Place the veggie mixture into a food processor with sour cream, cilantro, green chiles, cheese, cayenne and black pepper. Puree until smooth scraping the sides as needed.

4. Toss the pasta with the sauce. Plate and garnish with pumpkin seeds and cilantro.

Recipe & photograph by Laura Flowers.


Wednesday, November 10, 2010

Foodbuzz Scavenger Hunt


What do three hundred and fifty food bloggers do at dinner together? Simultaneously with each course they all pull out their cameras and start taking pictures, making me look like a serious amateur. It was surreal!

I told you I'd talk about that strange dream yesterday. So, Ryan Stern from Foodbuzz corners me against the wall of a ballroom. Then scarlet and gold liquids slosh from wine goblets as they float through the air and crash against my head. “Eat!” Ryan commands. I beg, “Please, no if I eat anymore I’ll literally explode.” “Dorian”, Ryan says, “The Sword of Truth. Test her.” Dorian Asch, Foodbuzz’s community manager pulls out a long gleaming white sword and walks toward me. I duck and try to slide against the wall to the freedom of the open glass doors around the corner.

Suddenly, I wake in a cold sweat. I start to chuckle, vowing to go on a semi-fast for the next week. Foodbuzz and their sponsors did an incredible job spoiling us this weekend, maybe a little to good. Or perhaps I shouldn’t read melodramatic wizard books after over-indulging all weekend.

When the exquisite lamb and scallop dinner ended Saturday, we were sent off on a scavenger hunt with our ridiculously full bellies. Sandy, the newest Foodbuzz staff member joined our group and “Tony (left) and The Gold Dust Gals” headed out into the evening to play in beautiful San Francisco.

As we were leaving, I collected 10 business cards as directed, but was naughty and kept them. Well, truth be told I forgot to turn mine in. Sorry! But now I can visit all those blogs I took cards from.

Bone weary and feet aching I ran outside with my team. We spot waiters running around and Julie grabs one for a dance. With number six out of the way we say a grateful goodbye and head into the brightly lit city night.


We tackle jumping jacks next, heck those are easy right? Getting a cable car to stop long enough to get a picture was a whole different matter. “Hey! There’s one, lets run over.” I swear those drivers knew we were up to no good. As soon as they spotted us they’d speed away. We got a picture on the third try. The driver was five seconds too late, but boy he was moving to get away! That's Julie, Diana, Tony, and Sandy with motion blur there.

Then the hippest guy in San Francisco (number four) strolls out of Chase bank. Isn’t he adorable? I’d wear a bow tie and cardigan too if I were 6 ½ feet tall. Sweetest guy ever. Although, I think everyone in San Francisco is nice. He was however, the hippest in my book.

Groan, we looked down at the list. We still had to toast drinks at a bar. Seriously? How the heck are we going to fit it in our gullets? Ugh ok, it’s for the team. We head over with Tony to Gold Dust, a chest-to-chest packed antique bar that screams old time San Fran. The waitress took our picture, it’s blurry but hell it’s a shot. Oh speaking of shots, I got one of Goldschlager Ugh. Why do I do this to myself in the name of fun? This has to be why I had that nightmare.

OK, what next. Snacks? Late night snacks? I swear we collectively groaned. “No. More. Food. No. I rebel. Ugh!” OK, Sarah thinks of hostess so we run across town to Walgreens. The poor guy who took our picture thought we were mental. He took our photograph only out of fear for his life and quickly dropped the camera and backed away into the shadows.


So that’s it. The whole boisterously fun scavenger hunt. Now all I want are vegetables, a nap, fewer blisters and a fully staffed kitchen. “Waitress, would you bring me a grilled vegetable sandwich please? One with a fancy little toothpick?” Oh wait, I’m the waitress, cook and photographer. I suppose it’s back to reality for this food blogger. See you next year Foodbuzz Festival! Hopefully I’ll be recovered by then.


Tuesday, November 9, 2010

Lemon Kissed Snickerdoodles

Well, I’m home. Or most of me is home. I think my mind is still at the Foodbuzz Festival. Last night I had a nightmare Foodbuzz’s Ryan Stern was threatening me to eat more with her weapon fork while wine glasses knocked against my head until I consumed them. It was a rather funny dream that left me chuckling, and I’ll tell you more about it tomorrow.

How was the festival? Imagine having food and alcohol forced upon you for two plus days by friendly waiters with never ending trays of tidbits while hanging out with three hundred and fifty interesting, fun, super cool food blogger friends. Pretty darn fantastic is how I’d rate it. I tried to introduce myself to everyone, still missed about half.

As for the photography sessions, they zoomed by way too fast. I wish we had more time to share, but that's ok. Hopefully we were of some help. Marc was great to work with by the way. He and I were pretty relaxed and happy, making it easy to get through the chaos of having to move rooms between sessions.

Oh hey Dawn, you won the Spyder from last week as your number was picked. I imagine you’ll put it to good use. In return I expect to borrow that pretty red camper of yours.

I’m off to avoid food some more and edit several super silly pictures of bloggers on a scavenger hunt for tomorrow. I hope they’ll make you laugh when you see them.

Lemon Kissed Snickerdoodles
Printer Version
Heads up, the dough will need to chill for about an hour in the refrigerator.


1 stick (1/2 cup) unsalted butter, softened
1 cup granulated sugar
¼ teaspoon salt
Zest of two lemons
1 tablespoon lemon juice
2 tablespoons whipping cream
1 egg
2 teaspoons baking powder
1 ¾ cups unbleached all-purpose flour

Cinnamon Sugar Mixture
1/3 cup granulated sugar
1 teaspoon cinnamon
1/8 teaspoon freshly grated nutmeg

1. Cream the butter, sugar, salt, lemon zest and lemon juice together. Beat in the whipping cream and egg. Beat in the baking powder and then mix in the flour until just combined. Refrigerate about 1 hour, or until cool, but not hard.

2. Preheat the oven to 375. Line two cookie sheets with parchment paper.

3. Mix together the cinnamon sugar ingredients in a small bowl. Scoop the dough with a mini or standard size cookie scoop and roll together with your hands into balls. Roll the balls in sugar mixture. Place two inches apart on cookie sheets.

4. Bake cookies for 10 to 11 minutes for standard size cookies, and 7 to 8 minutes for minis. Cool for 3 minutes on cookie sheets and then move to a cooling rack.

Recipe & photograph by Laura Flowers.


Monday, November 1, 2010

Crockpot BBQ Pulled Pork Sandwiches with Copycat KFC Coleslaw


This is my first and last post of the week as I’m leaving tomorrow to journey to San Francisco for the Foodbuzz Festival. Since I’ll be missing a whole week of posting recipes I hope I can make it up to you with a giveaway.

I’m giving away one slightly used Spyder calibration tool for a monitor. A calibration tool is what professionals photographers use to color correct their screens to a standard. Though it worked great with my PC, it couldn’t calibrate my Mactop. If you’re not a Mac user I think you’ll appreciate having this very cool tool.

Just leave a comment telling me why you could use the Spyder and I’ll do the random number thingy when I get back Monday.

See you when I get home! Or hopefully, see you at the festival.

Crockpot BBQ Pulled Pork Sandwiches with Copycat KFC Coleslaw

Printer Version
It isn’t a misprint; you’ll need two bottles of BBQ sauce for this recipe. One for tenderizing pork in the Crockpot and the other for flavoring it in the oven.


First step: Crockpot
1 (12 ounce) beer
18 ounce bottle BBQ Sauce
1 tablespoon seasoning salt
1 tablespoon olive oil
5 pounds boneless pork shoulder country style ribs

Combine the ingredients together in a slow cooker. Cook on high for 4 hours, or until meat shreds easily. Move pork to a cutting board and discard liquid. Shred with two forks and discard fat. Meanwhile, make the coleslaw and refrigerate, recipe below.

Second step: 9x13 inch pan
Shredded pork
1 (18 ounce) bottle BBQ sauce
1/2 teaspoon onion powder
1/2 teaspoon chili powder
1/2 teaspoon paprika
1/2 teaspoon salt
1/2 teaspoon black pepper
Pinch of cayenne pepper

Place the pork in the pan and preheat oven to 350 degrees.

Mix the rest of the ingredients together in a bowl and spoon over pork. Toss to combine. Cover with foil and bake for 30 minutes until heated through.

Assembly:
8 sandwich buns
BBQ Pork
Coleslaw

Warm the buns in microwave and top with pork and slaw. Serve immediately.

KFC Copycat Coleslaw
This is a variation of a copycat that’s been floating around for years. I’ve hunted for its origins, but wasn’t successful.

1 head cabbage, shredded
1 large carrot, shredded
2 to 3 tablespoons minced onions
1/3 cup granulated sugar
1/2 teaspoon salt
1/8 teaspoon pepper
1/4 cup milk
1/2 cup mayonnaise
1/4 cup buttermilk
1 1/2 tablespoons white vinegar
2 1/2 tablespoons lemon juice

Shred cabbage and carrots and place in a very large bowl. A food processor works well for this. Mix in onions.

Stir together the rest of the ingredients until smooth and toss with the cabbage mixture. Cover with plastic wrap and refrigerate for several hours before serving.

Recipes & photograph by Laura Flowers.


Tuesday, October 26, 2010

Butterfinger Caramel Apples

Having only one child can be a problem sometimes. Like when I need emergency kid models and one won't cut it. Thankfully, my friend Julie loaned me her two for this Halloween assignment. I wouldn't have been able to finish without them.

It’s so hard to be little and behave well for hours in the hot sun, but they did great. Sadly, the kids didn’t make it into Yum Food and Fun for Kids this time, but I still have cute shots of them to enjoy.

This kid-friendly recipe starts with a bag of caramels. Feel free to use any kind of Halloween candy you have around for pressing into the sides. I think Snickers bars, M&Ms or chopped chocolate covered pretzels would be especially tasty here.

Butterfinger Caramel Apples
Printer Version
This is a fun way to use up some of that excess candy and enjoy the fall apple harvest.

5 Granny Smith Apples
5 wooden dowels or popsicle sticks
3 (2.1 ounce) Butterfinger candy bars
14-ounce bag caramels, unwrapped
2 tablespoons half and half
1 teaspoon light corn syrup
Pinch of salt

1. Wash and dry apples. Twist off the stem and place a wooden dowel or popsicle stick into the apples. Lay out a piece of wax paper to set apples on.

2. Place candy bars in a gallon-sized bag and crush into small crumbs with the back of a spoon. Place crumbs on a large plate. Set aside.

3. Place caramels, half & half, corn syrup and salt together in a shallow bowl. Microwave in 30 second increments on high stirring at each stop. Repeat until well melted. Stir in vanilla extract.

4. Roll an apple in caramel spooning some over the top. Let the excess drip off and spoon off the bottom. Dip the bottom in the crushed candy. Scoop up some of the candy and pat crumbs onto the sides of apples. Place apple on wax paper.

5. Reheat caramel between each apple for 15 to 20 seconds. Stir and repeat with the rest of the apples. If desired, trim bases of apples with kitchen shears.

Yields 5 Apples. Prep time 20 minutes. Setting time 1 hour.

From Yum Food and Fun for Kids Magazine, October 2010 by Laura Flowers.


Sunday, October 24, 2010

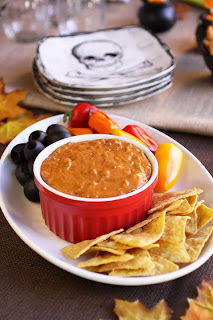
Howling Good Chili Cheese Dip

Ugh, I’m digging into the Halloween candy again! Just sitting here devouring Nerds, hoping the sugar hits my brain enough to push me into creative mode so I can finish putting together a photography session.

Now I need something salty like this dip. Too bad I photographed it back in August. If I’d kept it around it would’ve truly been Halloween worthy. Perfectly set right next to the porch skeleton and his bride.

I’m only kidding! I’m not that nuts. Isn’t it nice though to have some salty savory type treats to balance out all the sugary candy goodness around Halloween? This dip is both fast to throw together and pleasing to big and small goblins and ghouls.

On another note, If you’re attending the Foodbuzz Festival the following week, Marc from No Recipes and I will be leading two sessions. I hope you’ll sign up for one of them.

Marc will be tackling lighting, SLRs and point and shoots. I’ll be talking about composition, shape, texture, tension and photography rules to draw the eye to your shots. Marc and I will then break off into two groups and take our food blogging friends aside to teach them some hopefully new techniques.

It should be fun for all of us. I can’t wait to see some of you there!

Howling Good Chili Cheese Dip Printer Version

Kids and adults alike will dive into this cheesy meaty dip.

8 ounce package shredded Mexican Style Cheddar Jack
2 tablespoons all purpose flour
1 cup milk
1 teaspoon chili powder
1 teaspoon sweet paprika
1/4 teaspoon onion powder
1/4 teaspoon salt
15 ounce can chili, no beans
1 bag tortilla chips
Sweet mini peppers
5.75 ounce can colossal or jumbo black olives

1. In a bowl toss together the cheese and flour. Set aside.

2. In a 3 quart saucepan heat the milk, chili powder, paprika, onion powder, and salt over medium high stirring frequently until bubbles start to form around the sides of the pan. Add the cheese and stir until melted. Add the chili and stir until warmed through.

3. Serve warm with tortilla chips, sweet mini peppers and colossal sized black olives.

Yield 8 servings. Prep time 10 minutes.

Recipe from Yum Food and Fun for Kids October 2010 by Laura Flowers.


Thursday, October 21, 2010

White Chocolate Frosted Ghostie Cupcakes with Devil's Food Cakes

I keep several bottles of Torani flavoring syrups around for emergency middle of the afternoon latte’s and found they work well for flavoring frostings and other goodies too.

In these cupcakes the white chocolate syrup keeps the frosting light and fluffy, instead of dense and heavy, as real white chocolate tends to do.

Ghostie Cupcakes Printer Version

Devil’s Food Cupcakes
With this one bowl method cupcakes are easier and make for fewer dirty dishes.

1/2 cup shortening
1 3/4 cups sugar
1 1/2 teaspoon vanilla extract
1/4 teaspoon salt
3 eggs
1/2 cup cocoa powder
1 cup plus 3 tablespoons cold water
1 1/2 teaspoon baking soda
2 1/4 cups unbleached all purpose flour

1. Place 24 cupcake liners in two cupcake tins. Preheat oven to 350 degrees.

2. In a stand mixer, beat together shortening, sugar, vanilla extract, and salt. Add eggs and coco powder and beat until combined. Slowly mix in water. Add baking soda and flour and mix slowly at first, then faster until the mixture comes together. Fill tins half full using a cookie scoop.

3. Bake cupcakes for 20 minutes or until a toothpick comes out clean. Cool completely on wire racks.

Yield 24 cupcakes. Prep time 15 minutes. Bake time 20 minutes.

Whipped White Chocolate Frosting
Flavoring syrup gives all the flavor of white chocolate without making the frosting too dense.

4 sticks unsalted butter, softened slightly
2 lbs powdered sugar
1/2 cup Torani White Chocolate Flavoring Syrup
1/4 teaspoon salt
1 teaspoon vanilla
Wilton Black Sparkle Gel
Wilton tip 1A
Plastic spiders, optional

1. With a mixer, slowly beat together all the ingredients. Once combined, turn the mixer to high and beat for 3 minutes until fluffy.

2. Fit a pastry bag or gallon size bag with a Wilton tip 1A. Fill with frosting and pipe in large spirals around cupcakes squeezing at the top for a head. Let cupcakes set for 15 minutes.

3. Make eyes with sparkle gel by holding the bottle against the frosting. Squeeze gently and release. Slowly pull away from the frosting. Repeat with remaining cupcakes. If using, press plastic spiders into frosting to decorate.

Yield 5 cups. Prep time 7 minutes.

Recipe from Yum Food and Fun for Kids, October 2010 by Laura Flowers.


Related Posts with Thumbnails