Tuesday, October 26, 2010

Butterfinger Caramel Apples

Having only one child can be a problem sometimes. Like when I need emergency kid models and one won't cut it. Thankfully, my friend Julie loaned me her two for this Halloween assignment. I wouldn't have been able to finish without them.

It’s so hard to be little and behave well for hours in the hot sun, but they did great. Sadly, the kids didn’t make it into Yum Food and Fun for Kids this time, but I still have cute shots of them to enjoy.

This kid-friendly recipe starts with a bag of caramels. Feel free to use any kind of Halloween candy you have around for pressing into the sides. I think Snickers bars, M&Ms or chopped chocolate covered pretzels would be especially tasty here.

Butterfinger Caramel Apples
Printer Version
This is a fun way to use up some of that excess candy and enjoy the fall apple harvest.

5 Granny Smith Apples
5 wooden dowels or popsicle sticks
3 (2.1 ounce) Butterfinger candy bars
14-ounce bag caramels, unwrapped
2 tablespoons half and half
1 teaspoon light corn syrup
Pinch of salt

1. Wash and dry apples. Twist off the stem and place a wooden dowel or popsicle stick into the apples. Lay out a piece of wax paper to set apples on.

2. Place candy bars in a gallon-sized bag and crush into small crumbs with the back of a spoon. Place crumbs on a large plate. Set aside.

3. Place caramels, half & half, corn syrup and salt together in a shallow bowl. Microwave in 30 second increments on high stirring at each stop. Repeat until well melted. Stir in vanilla extract.

4. Roll an apple in caramel spooning some over the top. Let the excess drip off and spoon off the bottom. Dip the bottom in the crushed candy. Scoop up some of the candy and pat crumbs onto the sides of apples. Place apple on wax paper.

5. Reheat caramel between each apple for 15 to 20 seconds. Stir and repeat with the rest of the apples. If desired, trim bases of apples with kitchen shears.

Yields 5 Apples. Prep time 20 minutes. Setting time 1 hour.

From Yum Food and Fun for Kids Magazine, October 2010 by Laura Flowers.


Sunday, October 24, 2010

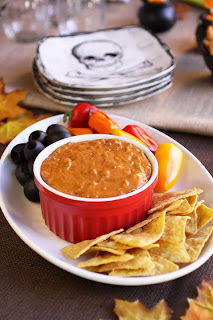
Howling Good Chili Cheese Dip

Ugh, I’m digging into the Halloween candy again! Just sitting here devouring Nerds, hoping the sugar hits my brain enough to push me into creative mode so I can finish putting together a photography session.

Now I need something salty like this dip. Too bad I photographed it back in August. If I’d kept it around it would’ve truly been Halloween worthy. Perfectly set right next to the porch skeleton and his bride.

I’m only kidding! I’m not that nuts. Isn’t it nice though to have some salty savory type treats to balance out all the sugary candy goodness around Halloween? This dip is both fast to throw together and pleasing to big and small goblins and ghouls.

On another note, If you’re attending the Foodbuzz Festival the following week, Marc from No Recipes and I will be leading two sessions. I hope you’ll sign up for one of them.

Marc will be tackling lighting, SLRs and point and shoots. I’ll be talking about composition, shape, texture, tension and photography rules to draw the eye to your shots. Marc and I will then break off into two groups and take our food blogging friends aside to teach them some hopefully new techniques.

It should be fun for all of us. I can’t wait to see some of you there!

Howling Good Chili Cheese Dip Printer Version

Kids and adults alike will dive into this cheesy meaty dip.

8 ounce package shredded Mexican Style Cheddar Jack
2 tablespoons all purpose flour
1 cup milk
1 teaspoon chili powder
1 teaspoon sweet paprika
1/4 teaspoon onion powder
1/4 teaspoon salt
15 ounce can chili, no beans
1 bag tortilla chips
Sweet mini peppers
5.75 ounce can colossal or jumbo black olives

1. In a bowl toss together the cheese and flour. Set aside.

2. In a 3 quart saucepan heat the milk, chili powder, paprika, onion powder, and salt over medium high stirring frequently until bubbles start to form around the sides of the pan. Add the cheese and stir until melted. Add the chili and stir until warmed through.

3. Serve warm with tortilla chips, sweet mini peppers and colossal sized black olives.

Yield 8 servings. Prep time 10 minutes.

Recipe from Yum Food and Fun for Kids October 2010 by Laura Flowers.


Thursday, October 21, 2010

White Chocolate Frosted Ghostie Cupcakes with Devil's Food Cakes

I keep several bottles of Torani flavoring syrups around for emergency middle of the afternoon latte’s and found they work well for flavoring frostings and other goodies too.

In these cupcakes the white chocolate syrup keeps the frosting light and fluffy, instead of dense and heavy, as real white chocolate tends to do.

Ghostie Cupcakes Printer Version

Devil’s Food Cupcakes
With this one bowl method cupcakes are easier and make for fewer dirty dishes.

1/2 cup shortening
1 3/4 cups sugar
1 1/2 teaspoon vanilla extract
1/4 teaspoon salt
3 eggs
1/2 cup cocoa powder
1 cup plus 3 tablespoons cold water
1 1/2 teaspoon baking soda
2 1/4 cups unbleached all purpose flour

1. Place 24 cupcake liners in two cupcake tins. Preheat oven to 350 degrees.

2. In a stand mixer, beat together shortening, sugar, vanilla extract, and salt. Add eggs and coco powder and beat until combined. Slowly mix in water. Add baking soda and flour and mix slowly at first, then faster until the mixture comes together. Fill tins half full using a cookie scoop.

3. Bake cupcakes for 20 minutes or until a toothpick comes out clean. Cool completely on wire racks.

Yield 24 cupcakes. Prep time 15 minutes. Bake time 20 minutes.

Whipped White Chocolate Frosting
Flavoring syrup gives all the flavor of white chocolate without making the frosting too dense.

4 sticks unsalted butter, softened slightly
2 lbs powdered sugar
1/2 cup Torani White Chocolate Flavoring Syrup
1/4 teaspoon salt
1 teaspoon vanilla
Wilton Black Sparkle Gel
Wilton tip 1A
Plastic spiders, optional

1. With a mixer, slowly beat together all the ingredients. Once combined, turn the mixer to high and beat for 3 minutes until fluffy.

2. Fit a pastry bag or gallon size bag with a Wilton tip 1A. Fill with frosting and pipe in large spirals around cupcakes squeezing at the top for a head. Let cupcakes set for 15 minutes.

3. Make eyes with sparkle gel by holding the bottle against the frosting. Squeeze gently and release. Slowly pull away from the frosting. Repeat with remaining cupcakes. If using, press plastic spiders into frosting to decorate.

Yield 5 cups. Prep time 7 minutes.

Recipe from Yum Food and Fun for Kids, October 2010 by Laura Flowers.


Wednesday, October 20, 2010

Lightened Up Weeknight White Corn Chowder

Swapping half and half for cream and thickening the chowder with potatoes lightens this comfort food up for a weeknight meal.

Before I set you free with the recipe, I want to talk about this photograph for a minute. Traditionally food isn’t shot in high contrast light, but there are situations where it works better than diffuse light. When you need to highlight texture or the food is plain looking you can sometimes increase the visual appeal with shadow and harsher light.

For this photograph I brought the chowder into an interesting diagonal shadow coming through the window in the warm late afternoon light and put a polarizer on my 50mm macro lens. I then softened the light with a soft box coming in at the same direction. With my focus on the chowder, I shot it at a fairly low aperture of f/3.2 to soften the image around the bowl and to bring the intensity of the harsh light down a bit more.

If you're learning to shoot food I hope this gives you some fun ideas to try, but now that I’ve more likely lulled you to sleep, here’s the tasty recipe.

Lightened Up Weeknight White Corn Chowder
Printer Version
Do not add bacon. Do not pass go. Go directly to a kitchen, any kitchen, and make this corn chowder immediately. I promise you won’t regret it.


1 tablespoon olive oil
2 tablespoons butter
1 large onion, diced
2 cloves garlic, minced
2 teaspoons Old Bay Seasoning
1/2 teaspoon dried thyme
1/4 cup all purpose flour
3 (14.5 ounce) cans Swanson’s Organic Vegetable Broth or Organic Chicken Broth
2 large Russet potatoes, diced
2 teaspoons dried parsley
1 teaspoon salt
1/2 to 1 teaspoon black pepper (I like my corn chowder really peppery and add the full teaspoon)
2 cups half and half
16 ounce bag frozen super sweet white corn

1. Heat the oil and melt the butter until it foams in a large pot over medium high heat. Add the onion and sauté until softened and starting to turn golden; about 10 minutes. Turn the heat down if the onions start to burn.

2. Add the garlic, Old Bay and thyme to the pot and cook for 1 minute. Add the flour and cook for 3 or 4 minutes stirring frequently. Deglaze the pot with some of the broth scraping down the bottom well. Then add the potatoes, the rest of the broth, parsley, salt and pepper and bring to a boil. Boil until the potatoes fall apart with a few pieces left; 10 to 15 minutes.

3. Add the half and half and bring to a rolling boil. Stir often and boil until thickened to taste. Add the corn and cook for 10 minutes stirring often so the corn doesn’t stick to the bottom. A little sticking is caramelizing, a lot of sticking is burning! Serve with good crusty bread.


Recipe & photograph by Laura Flowers.


Tuesday, October 19, 2010

Dotty Popcorn Balls on a Stick

I shot this recipe so long ago I’d nearly forgotten about it. Now that I’ve remembered, I think I’ll take these orange tinted popcorn balls as goodies to my daughter’s school Halloween party.

The stick itself is more of a gimmick on these fall threats. Cute, but not necessary, and I’ll be leaving them off when I make these for the kids. Feel free to skip that part as well; because stick or no stick, these candy packed treats will be welcomed by popcorn ball lovers everywhere.


Dotty Popcorn Balls on a Stick

Printer Version
Bright and fun this is a great recipe to get kids excited to help out in the kitchen.


¾ cup popcorn kernels
16-ounce bag mini marshmallows
4 tablespoons unsalted butter, cut into cubes
2 tablespoons water
¼ teaspoon salt
Wilton Orange Icing Color Paste
7.5 ounce box Dots Candy (Dots can be omitted for regular popcorn balls)
8 inch cookie treat sticks or dowels

1. With an air popper, pop popcorn kernels in two batches into a large bowl. Pick out and discard unpopped kernels. Add the Dot candies and set aside. Lay out a long sheet of wax paper.

2. Add the mini marshmallows, butter cubes, water and salt to a large microwave safe bowl. Microwave on high in 30 second increments until melted stirring after each turn. Then stir in a small amount of orange color paste.

3. Pour the marshmallow mixture over the popcorn. Toss well to coat. Wet hands and scoop out mixture with two hands. Press the batter together well. Set on the wax paper. Repeat with the rest of the popcorn mixture wetting hands as needed.

4. Insert the sticks all the way through the popcorn balls. Press the popcorn around the sticks well. Place back on the wax paper to dry. Repeat with the rest of the popcorn balls.

5. Let sit for two hours to dry. Once the popcorn balls are solid wrap in sheets of wax paper and secure with rubber bands or ribbons.

Yield 11 popcorn balls. Prep time 20 minutes. Total time 2 hours 20 minutes.

Recipe and photograph for Yum Food and Fun for Kids magazine, October 2010 by Laura Flowers.

Monday, October 18, 2010

Golden Apple Pie with Maple Syrup and Gingersnap Filling


This is good pie. Strike that. This is seriously great pie that I could eat everyday for the next year. This is also pie for the sake of my waistline I should never make again.

Therefore, I am passing off my pain to you. I’m happy we picked only one bag of apples Friday, or I’d be buying bigger pants.

Golden Apple Pie with Maple Syrup and Gingersnap Filling
Printer Version
Gingersnaps help soak up the maple syrup and add flavor of their own to this fall apple pie.


Pastry for a deep dish two crust pie
6 cups peeled and thinly sliced Golden Delicious Apples, or other crisp sweet apple
1/2 cup real maple syrup
1/2 cups finely crushed store bought gingersnaps
1/4 cup dark brown sugar, packed
1 tablespoon flour
1/2 teaspoon cinnamon
1/8 teaspoon salt
3 tablespoons butter
Sugar for garnishing pie

1. Place the oven rack on the lower third of the oven and preheat to 400 degrees. Line a 9 1/2 “ deep dish pie pan with a bottom pastry.

2. Mix the apples with the maple syrup and gingersnaps in a large bowl. In a small bowl mix the brown sugar, flour, cinnamon and salt. (Don’t skip this step or your pie will have starch clumps.) Toss the sugar mixture in with the apples and arrange the mixture nicely in the pie shell.

3. Dot the pie with butter, top with the second pastry and flute the edges. Sprinkle with sugar. Cut holes in the crust to vent.

4. Bake for 30 minutes. Place on a pie crust shield and lower the temperature to 375 degrees. Bake for 25 to 30 more minutes until the crust is golden and the filling is bubbly. Cool for several hours before serving.

Recipe & photograph by Laura Flowers.


Sunday, October 17, 2010

Not Your Average Baked Spaghetti

Jesse asked me to make baked spaghetti for our Friday evening get together with friends. Ok, that’s only partially true. Jesse has been asking me on a semi-regular basis to make baked spaghetti since we got married.

I’ve been beating around the bush trying to escape this task for years. The only baked spaghetti I ever knew were dried out noodles with sickeningly sweet Ragu that always arrived with the traditional potluck fair.

I called Julie and warned her Jesse had requested baked spaghetti. She tried to be kind, but I don’t think her experiences have been much better. I couldn’t imagine serving my poor friends a meal they dreaded. They deserved something they could at least choke down. So, I sucked it up and gave this recipe some thought and attention. The results were much better than I expected, and most certainly not as bad as my worst fears.

Or perhaps, everyone was just being polite and ate it anyway! Hey, it could happen.

Zesty Crockpot Marinara Sauce

Printer Version
This marinara cooks for about 10 hours, so it’s often easier to make this the day before you’ll be using it for baked spaghetti.


28 ounce can crushed tomatoes in rich puree

29 ounce can no sugar tomato sauce

6 ounce can tomato paste

1 cup water

1/2 cup good red wine

1/4 cup extra virgin olive oil

3 cloves garlic, crushed and finely minced or pressed through a garlic press

2 to 3 teaspoons sugar, to taste

1/2 teaspoon salt

1/2 teaspoon black pepper

2 teaspoons onion powder

1 teaspoon sweet paprika

1 teaspoon Italian seasoning

1 teaspoon dried oregano

1/2 teaspoon dried basil

1/8 teaspoon red pepper flakes

1 large bay leaf or two small


Stir the ingredients together in a large Crockpot. Cook on low for 10 to 12 hours, stirring occasionally.


Not Your Average Baked Spaghetti
Printer Version
You’ll need a big 10” x 15” baking dish for this recipe, if you don’t have one you can break it up into two smaller pans. For a vegetarian version, leave out the sausage and toss the spaghetti with the extra marinara sauce before layering it into the bottom.


4 cups Crockpot Marinara Sauce, made the day before
1 pound hot Italian sausage
1 pound spaghetti noodles, broken in half
1/2 cup reserved pasta water
2 tablespoons butter
1 tablespoon extra virgin olive oil
32 ounce container whole milk ricotta
2 cups shredded Parmesan Reggiano, divided in half
2 cups shredded mozzarella

1. Brown the sausage in a skillet breaking it up well. Drain off the fat and set aside. Preheat the oven to 400 degrees and get out a 10”x 15” baking dish.

2. Boil the spaghetti to al dente according to package directions in heavily salted water. Toward the end of cooking time reserve 1/2 cup of pasta water. Drain the spaghetti and toss with butter and olive oil. At this point you can also toss the spaghetti with the leftover sauce if preferred. Place the noodles in the baking dish.

3. In a bowl, mix the ricotta with the reserved pasta water. Place the sausage on top of the noodles and spread the ricotta over everything.

4. Top ricotta with 1 cup Parmesan Reggiano. Spread 4 cups of sauce over the cheese and top with mozzarella and the remaining Parmesan.

5. Bake 35 to 40 minutes until the cheese is golden brown and the sides are bubbly. Rest for 10 minutes before serving. Serve with the extra sauce if desired.

Recipes & photograph by Laura Flowers.


Friday, October 15, 2010

Zesty Crockpot Marinara Sauce with Options

This is truly a Slow Cooker marinara, as you don’t have to brown anything beforehand. So easy and flavorful, I hope I can tempt you into making your sauce at home if you’re not doing so already.

If desired, turn it into a meat sauce by browning a pound of ground beef or bison together with half a pound of Italian sausage. Drain off the fat, and add it with the rest of the ingredients.

For a mushroom sauce, very thinly slice two packages of mushrooms and add them to the crock.

Zesty Crockpot Marinara Sauce
Printer Version
Using good quality canned tomato products makes a big difference in this sauce. Also, If you have time, rubbing the leafy spices between the palms of your hands helps release their flavors.


28 ounce can crushed tomatoes in rich puree
29 ounce can tomato sauce
6 ounce can tomato paste
1 cup water
1/2 cup good red wine
1/4 cup extra virgin olive oil
3 cloves garlic, crushed and finely minced or pressed through a garlic press
2 to 3 teaspoons sugar, to taste
1/2 teaspoon salt
1/2 teaspoon black pepper
2 teaspoons onion powder
1 teaspoon sweet paprika
1 teaspoon Italian seasoning
1 teaspoon dried oregano
1/2 teaspoon dried basil
1/8 teaspoon red pepper flakes
1 large bay leaf or two small

Stir the ingredients together in a large Crockpot. Cook on low for 10 to 12 hours, stirring occasionally.

Recipe & photograph by Laura Flowers.


Wednesday, October 13, 2010

Apple Cider Citrus Punch

This recipe is really more juice-like than punch-like, but it’s light, refreshing and something the kids will enjoy maybe more than the adults. It would go well at a fall party for children. Or perhaps welcomed by the kid at heart.

When I think of this punch, I recall the kids I took photographs of all dressed up for Halloween in August. I can’t help but laugh and remember the looks on the faces of passersby who must have thought we were totally and completely insane.


Apple Cider Citrus Punch

Printer Version
Simple and sweet, serve this punch warm or chill and enjoy cold.


8 cups apple cider or apple juice
3/4 cup cran raspberry concentrate, thawed
Peel of 1 orange

Warm the ingredients in a large saucepan over medium low heat. Serve immediately for warm drinks, or cool and then refrigerate for cold punch.

Yield 8 servings. Prep time 10 minutes.

From "Yum Food and Fun for Kids" Magazine, October 2010, by Laura Flowers.


Monday, October 11, 2010

Spooky Triple Cheddar Crackers

Is it really October already? Then I suppose it’s time for some Halloween treats. I wrote and shot this recipe for the October issue of Yum Food & Fun for Kids. Now that the magazine is out I can share these crackers with you.

I gave Kathia from Pink Little Cake first dibs on these cheesy snacks, so you may have already noticed them floating around. She was kind enough to have me as part of her fun filled month of Halloween guest bloggers. If not though, here’s the recipe.

Oh, I almost forgot! I wanted to share that I get to attend Foodbuzz's Festival thanks to Nature's Pride Bread. Thanks for crossing your fingers for me, it must have worked! I can't wait to see all my food blogging friends!

Nature's Pride thank-you thank-you thank-you!

Spooky Triple Cheddar Crackers
Printer Version
Making crackers at home is like magic
and these are the most magic of all as you watch them puff up into cute little Halloween shapes. Cut this recipe into any shape you prefer to enjoy homemade crackers year round.

1 1/3 cup unbleached all purpose flour
1 teaspoon salt
½ teaspoon paprika
½ teaspoon onion powder
6 tablespoon unsalted butter, diced
8 ounce package shredded triple cheddar cheese, or cheddar of choice
2 egg yolks
2 tablespoons water

1. Line cookie sheets with parchment paper. Set aside.

2. In a food processor pulse together the flour, salt, paprika and onion powder. Add the butter and process until combined. Add the cheddar and pulse until finely chopped. Process in the egg yolk and water until the mixture forms a ball.

3. Remove the dough and knead in your hands for a few turns. Divide in half and roll one part between two pieces of wax paper to 3/8 inch thick. Peel off the wax paper and stamp dough with cookie stamps or cut with cookie cutters. Place the crackers on cookie sheets.

4. Freeze the crackers on the cookie sheets for 15 minutes. Meanwhile, preheat the oven to 325 degrees. Move the cookie sheets to the oven and bake for 20 minutes. Cool crackers on cooling racks. Store in an airtight container.

Yields 54 3/8 ounce cookies. Prep time 30 minutes. Baking time 20 minutes.

Recipe & photographs for Yum Kids October 2010 by Laura Flowers.


Saturday, October 9, 2010

Steak & Onion Pizza with Cheddar Cheese and Garlic Cream Sauce


A few months ago, I splurged on a small package of New York strip bison steaks thinking someday very soon I’d make Jesse a nice dinner when we had a night on our own. That someday just now arrived and when I opened the package I found a bonus! Inside were three steaks instead of two.

I suppose I could have called a friend for dinner, but instead selfishly saved the extra piece for pizza. What my friends don’t know won’t hurt them, right?

Steak & Onion Pizza with Cheddar Cheese and Garlic Cream Sauce Printer Version
This pizza is so worth the splurge.

1 recipe pizza dough, below
1 recipe garlic cream sauce, below
1 New York Strip Steak or other steak of choice
1 1/2 cups shredded mozzarella
1/2 cup shredded sharp cheddar
1/2 to 2/3 cup very thinly sliced red onion
1/3 cup freshly grated Parmesan
Salt & Pepper
Olive oil for brushing and drizzling

1. Place a square pizza stone on one side of the grill and preheat on high. Brush the steak with a little oil and season with salt and pepper. Grill the steak to rare. Set aside to cool for a few minutes leaving the grill on. Slice any fat off the steak and slice into thin bite size pieces.

2. Cut out a piece of parchment paper the size of your pizza stone. Place it on a cookie sheet. Divide pizza dough in half and set the other aside for another pizza. Roll out dough and brush with olive oil. Move the dough to the parchment.

3. Spread a layer of garlic cream sauce onto the dough. Top with mozzarella, cheddar, lots of onion slivers, steak and Parmesan. Season with salt & pepper and drizzle top with a little olive oil.

4. Slide the pizza with parchment onto the baking stone. Cook for 5 to 8 minutes until the top is bubbly and the bottom crust is deeply browned.

Pizza Dough
1 cup lukewarm water

2 1/4 teaspoons dry active yeast

1 teaspoon honey or sugar

3 cups unbleached all-purpose flour or bread flour

1 tablespoon olive oil

1 teaspoon salt

1. In a stand mixer bowl add the water, yeast, and honey or sugar and let sit for 5 minutes until foamy. Add the flour, olive oil, and salt and mix with the dough hook until well kneaded. If you use bread flour you’ll need to drizzle in a little more water until the dough forms a ball.

2. Olive oil a large bowl. Remove the dough from the stand mixer and knead on a clean surface for two more minutes. Place the dough in the oiled bowl and cover with plastic wrap. Let the dough rise in a warm place for at least an hour before using.

Notes: I use part whole wheat flour in my pizza dough sometimes, when doing this add a little extra water if needed until the dough is lightly tacky.

Garlic Cream Sauce
1 Tablespoon unsalted butter

1 Tablespoon olive oil

1 clove of garlic
1/2 cup heavy cream

1/8 teaspoon coarse sea salt

1/8 teaspoon fresh cracked pepper

1/4 cup Parmesan Reggiano

1. In a saucepan melt the butter and olive oil together over medium heat. Add the garlic and sauté for about 30 seconds until fragrant.

2. Turn the heat to medium low and add the rest of the ingredients, but add the cheese last so it doesn’t hit the hot pan and seize up. Stir constantly until it coats the back of a spoon. Turn off the heat and move the sauce to a bowl.

3. Sauce will thicken quite a bit as it cools.

Recipes and pictures by Laura Flowers.


Thursday, October 7, 2010

Yellow Tomato & Zucchini Pizza with Garlic Crust


The last of the summer tomatoes seem to be trickling into my house. Not from my plants. I’m too soft to end the lives of the cute little slug-like snail creatures eating all my tomatoes. The only crops around here come from my CSA or my mother’s garden.

Feeling sorry for the tomato loving bugs has proved once again to be a terrible way to raise productive plants. I must be strong and firm next year. It’s their lives or mine! Or, I could just rob the tomatoes out of mom’s garden. Why do I try to grow tomatoes anyway?

I don’t think I’m cut out for the cruelty of gardening.

Yellow Tomato & Zucchini Pizza with Garlic Crust
Printer Version
Very soon I’ll be missing these colorful, tasty late summer vegetable pizzas.


1 (12 to 14 inch) pizza dough, stretched onto a pan
1 recipe Zesty Old School Pizza Sauce

1 tablespoon extra virgin olive oil

3/4 cup mozzarella, shredded

1/2 cup Asiago cheese, shredded

A few thinly sliced zucchini rounds

2 small yellow or red tomatoes, chopped 

3 to 4 tablespoons chopped onions

2 cloves garlic, finely minced

3 tablespoons Parmesan cheese

Salt & pepper
Onion powder
Basil olive oil (Optional, but makes this pizza even better if you have it.)

Cornmeal


Preheat the grill on high to 500 degrees, with the lid closed. Brush a good quality pizza pan lightly with olive oil, and sprinkle with cornmeal. Set aside.

Place chopped tomatoes on a paper towel lined plate. Sprinkle with salt and pepper and cover with a paper towel to drain.


Stretch and roll out the pizza dough until thin, and place on the pan. Brush the top with 1 tablespoon olive oil, and spoon on as much pizza sauce as desired.

Pat the liquid out of tomatoes.

Top pizza with the mozzarella, Asiago, zucchini, tomatoes, onions, minced garlic and Parmesan. Sprinkle with salt, pepper and onion powder. Drizzle top with a little basil olive oil.


Set pizza on the grill and close the lid. Cook for 5 to 8 minutes or until cooked through and bottom of crust is browned.


Garlic Pizza Dough

2 1/4 teaspoons active dry yeast

1 teaspoon honey or sugar

1 cup lukewarm water

1 tablespoon olive oil

3 cups unbleached all purpose flour

1 tablespoon dried parsley

1/2 teaspoon garlic powder

1/2 teaspoon onion powder

1 teaspoon salt


Place water, yeast, and honey or sugar into a stand mixer bowl. Stir to combine and set aside for 10 minutes.


Place the rest of the ingredients in the bowl and knead with a dough hook on low speed for 5 to 10 minutes. Remove the dough from the bowl and knead by hand on a clean surface for another minute.

Pat into a circle.

Lightly oil a large bowl and place the dough inside, flipping once to coat with oil. Cover and let rise in a warm place for 30 minutes.

 Makes two large pizzas.

Zesty Old School Style Pizza Sauce
The recipe makes enough sauce to cover three medium, or two large pizzas.


1 (8 ounce) can tomato sauce
 without sugar
1 (6 ounce) can tomato paste

1 teaspoon dried oregano

1 teaspoon dried basil

1 teaspoon garlic powder

1/2 teaspoon onion powder

1 teaspoon ground sweet paprika

1 teaspoon sugar

1/4 teaspoon salt

Fresh cracked pepper to taste

2 Tablespoons olive oil

1 teaspoon white vinegar


Place all the ingredients in a medium sized bowl and stir together.

Makes 1½ cups of pizza sauce.


Notes: Because this recipe is so quick to prepare, I keep extra tomato sauce and tomato paste around for spur of the moment pizza nights.


Recipes & photograph by Laura Flowers.


Tuesday, October 5, 2010

Buttermilk Biscuits and Sausage Gravy


I don’t know about you, but I’ve been craving comfort food lately. Maybe because I can finally turn the oven to 450 degrees without running the air conditioner on high for the next twelve hours! It must be a fall thing.

Besides, I figure I’ve got a few more bike rides to fit in before it snows. I’m going to enjoy this splurge while I can.

Buttermilk Biscuits Printer Version
Prepped with a food processor, these mile high biscuits come together so fast your oven won't be preheated in time, so turn it on several minutes before you begin.

1 3/4 cups all-purpose flour

2 teaspoons baking powder

1/2 teaspoons baking soda
1/2 teaspoon salt

6 tablespoons cold butter cut into pieces

3/4 cup buttermilk


Preheat oven to 450 degrees. Cover an insulated cookie sheet with parchment paper. If you don’t have one, double up two cookie sheets together.


Put flour, baking powder, baking soda and salt into a food processor and process to mix. Add butter and pulse until crumbly with small pea sized butter pieces still in places. Add buttermilk and pulse just until the dough comes together.


Flour a surface, dump out dough, and then flour top of dough. Kneed a few times and roll out to about 1 inch thick. Cut out biscuits with a drinking glass or biscuit cutter. Continue to roll out dough and cut biscuits until dough is used up.


Place biscuits on cookie sheet and bake for 12 to 15 minutes until lightly golden on top.


Makes 8 to 10 biscuits.

Sausage Gravy
Good sausage gravy is a guilty pleasure of mine.

1 package Jimmy Dean All Natural Regular Pork Sausage
4 tablespoons butter, diced
3 tablespoons extra light olive oil or vegetable oil
1/2 cup flour
1 teaspoon salt
1 teaspoon pepper
Pinch of cayenne pepper
1/8 teaspoon dried thyme
4 cups milk

Break up sausage into a very large skillet or wide bottom pot. Cook over medium high breaking apart the sausage into small pieces. When no longer pink and well cooked remove the sausage from the pan leaving the grease behind and set the meat aside. Add butter and oil and stir occasionally until the butter is melted.

Next, add the flour and cook for 3 to 4 minutes stirring frequently. Add the salt, pepper, and cayenne. Rub the thyme between the palms of your hands to crush it while adding to the pan. Slowly stir in the milk and bring it to a simmer stirring constantly until gravy is thickened to taste. Add the sausage back in and cook for a couple minutes to warm through.

Season with more salt and pepper if needed and serve hot over biscuits.

Recipes & Pictures by Laura Flowers.


Monday, October 4, 2010

Bread Machine Jam Rolls

After a very long hot day of white water rafting in Riggins, Idaho this summer we stopped by the Fiddle Creek Fruit Stand. This part fruit stand, part grocery store is packed full of nostalgia. A family run place, it looks like it's been passed down forever.

Out of school for the summer, three small girls helped their grandfather at the cash register while he tended to customers, answered questions and introduced us to local items, proudly offering tastes of recently arrived crops.

It made me a bit teary eyed to think that this piece of our past is nearly extinct. With super markets and big food, everything feels a bit on the impersonal side. I couldn’t help but wonder, “What kind of progress have we really made?” as I walked past several hues of lilacs and thornless raspberry plants for sale.

I purchased some plums, but wanting something to remember the place by I grabbed a couple jars of Fiddle Creek’s homemade Blackcap Jam. Blackcaps, if you haven’t had them yet, are luscious little black raspberries.

Since then, I’d been miserly enjoying it and finally decided to splurge and make these old-fashioned breakfast rolls. I felt it fit the store. Homemade and special. Well, with a little help from my bread machine they were homemade!

Bread Machine Jam Rolls Printer Version
I used Blackcap jam, but any good quality jam or marmalade will work in these rolls.

Dough
1 cup warm milk (110 degrees F)
1/3 cup butter, melted
1/2 cup granulated sugar
2 eggs, slightly beaten
1 teaspoon salt
4 1/2 cups bread flour
2 1/2 teaspoons active dry yeast

Filling
1/4 cup butter, softened
Slightly heaping ½ cup good quality jam, stirred

Topping
1/4 cup butter, melted and cooled to room temperature
Granulated sugar for sprinkling, optional

Directions
1. Warm the milk in the microwave for 30 to 45 seconds until very warm to the touch. Place the milk, melted butter and sugar in the bread machine and stir to combine. Let sit for 15 to 20 minutes or until liquid reaches room temperature.

2. Stir in the eggs and salt. Add the flour and place the yeast on top of the flour. Select the dough cycle and press start.

3. Butter a 9x13 inch pan; set aside. Roll dough into a 16x21 inch rectangle. Spread dough with 1/4 cup butter then spread jam over the butter. Roll up dough to make a long log and slice it in half, then slice each piece in half again. Cut each of those quarters into 3 slices.

4. Place rolls in the pan seam side toward the other rolls. Gently brush rolls with melted butter on the tops and sides. Sprinkle with sugar if desired. Cover with plastic wrap or a tea towel and let rise in a warm place for 30 minutes.

5. Meanwhile, preheat the oven to 400 degrees. Bake rolls for 16 to 18 minutes until golden brown.

Pictures and recipe by Laura Flowers


Related Posts with Thumbnails